A One Week Downloadable Itinerary Traveling Through the Philippines in Cebu and Bohol, Chasing Waterfalls and Coral Reefs
- Garrett Busch
- Jul 5, 2024
- 17 min read

About the Trip
We planned a trip to The Philippines based on a single picture of Kawasan Falls. Our honeymoon itinerary backpacking over land from Singapore to Vietnam was already set, but once we saw this location we knew we had to add the Philippines onto our trip. If you’re already in Southeast Asia, flights to the Philippines are cheap and abundant. Even if you aren’t going to anywhere else in the area this week long itinerary would give you a trip of a lifetime just to these destinations. You could also take this itinerary and extend your trip another week or two by hoping around to other nearby islands such as the famous Palawan or Coron. No matter how you do it, put the Philippines to the top of your travel list and make it a priority, you will not forget it. Once you’re in country the cost of travel is incredibly cheap and the natural beauty of the country has something for everyone. To date after traveling across the world and almost 40 countries, the Philippines is still one of our two favorite international destinations.
Itinerary Overview and Download

Above is a detailed map of the main attractions on Cebu Island.

Above is a detailed map of the main attractions on Bohol Island, South and East of Cebu Island.
On every blog we will include Word Documents version of an itinerary. We have a short version which is meant to be a shell that you can edit or add to depending on the level of detail you want. Our long version has copy and pasted this entire detailed writeup below without the pictures to condense the length. Take your pick or download both!
We also include a Trips Log with every trip, this is a fun way in Excel to track where you go and make your own makeshift journal of the trip in the notes section. You can take this exact template, add to it over time, and upload it to make your own Google Maps of your trips you’ve done. Yes, you can do something similar by pinning locations on Google Maps, but this spreadsheet allows you to log your distance hiked, elevation gain, sort different trips in different colors in Google easily, you can also sort by category i.e. breweries, vineyards, hikes, city attractions, etc. In essence, this gives you an offline document that is safe if you ever lose your Google Account and gives you infinitely more freedom in how you log, categorize, sort, and note what you do.
Housekeeping Items for the Philippines – Our Best Tips
The Philippines is a hot and humid country, very hot and humid. Pack light and bring a backpack. You don’t need enough clothes to be lugging around a suitcase. If you ride in a taxi or shuttle, space will be tight, save yourself the hassle. We travel with our 40 liter Osprey backpacks and recommend them as they have lasted us now 7 years, through 50 some odd trips, hundreds of climbing days, and everything in between. These things are seriously bulletproof on wear and tear.
Make sure your accommodation has HVAC air conditioning. This might sound silly, but it’s actually harder to find than you would think in this country. We stayed at one guest house that didn’t and we are pretty heat tolerant, but I woke up at 4 AM so hot I had to go into the shower to try to cool off, which wasn’t incredibly successful since the minimum water temperature was like 90 degrees due to the heat.
Once you’re at your base on each island, rent a scooter. The road speed limits are pretty low and it is a very common way to travel around he islands. If you’re worried stay slow and to the right-hand side of the road and you will be just fine. Scooter rentals are like $10-15 per day and plentiful at most guesthouses and at standalone shops. This makes accessing waterfalls and attractions along the highway incredibly convenient and at your own pace.
If you’re looking to go into the interior of either island, i.e. to the Chocolate Hills or Osmena Peak, you better have a dirt bike or rent a car because the roads in the interior will require a 4x4 vehicle or Off-road high clearance vehicle. Trust us, we tried with a scooter. Even with a lot of perseverance, pushing, and running it up the crazy steep hills, it simply was not possible. A guide for these attractions is also an excellent way to go.
BRING DRAMAMINE WITH YOU!!! This has become a staple on all of our travels now, but in any country with rough roads and ferry rides, you will seriously want Dramamine. It is a non-drowsy over the counter antinausea medication. Thank us later. If you’re taking an airport shared van transfer down to Moalboal I would even take one before you’re going to depart in the van, they drive extremely aggressively.
Dry season in the Philippines is December to April and that is when the waterfalls will look their most iridescent blue and green that they are most famous for. We visited in Late June and the waterfalls were still the same gorgeous colors for us and we didn’t get a single day of rain, although with the heat we wouldn’t have minded if we did.
Bring your own snorkel. We went snorkeling almost every day we were in the Philippines and it was so worth it having our snorkels with us that were cheap on Amazon rather than having to keep renting them everywhere and have used ones. The water along the islands is calm and the snorkeling is doable for those at any level. You will see huge schools of thousands of sardines, sea turtles, reefs, and various fish all within feet of the sea shore.
Notes About Philippines Logistics
1 U.S. Dollar is roughly 59 Philippine Pesos.
More people speak English than you might think.
Rental cars are abundantly cheap or if you’re on a budget use a shared van to get to your base from the airport, then rent a scooter for about $5-6 per day or 300-350 pesos.
The Detailed Itinerary
Where to Fly:
· Cebu City (CEB) airport is where you will fly in for these islands. Cebu City is actually rather large and a bustling city with plenty of traffic. If you can try to avoid rush hour when leaving the city or coming back in. No matter where you come from in the world you will likely be connecting your flights either in Tokyo, Singapore, or Bangkok.
Day 1: Arrive in Cebu City, stop off at Sirao Gardens, and Head Down to Moalboal
Where to Stay:
· D´Gecko Hotel – If you’re on a budget for $28 per night this can’t be beat. You’re steps away from Panagsama Beach and snorkeling with sardines and turtles. These rooms have air conditioning and are central to everything in town.
· Pawikan Seaview Villa with breakfast – If you have the means at $165 per night, this resort has the feel of a property 4x in price. The pool at this villa is incredible and the breakfasts are divine. This is true luxury.
· Base yourself in Moalboal and spend the next 3 nights.
Where to Eat:
· At night Moalboal comes alive with street vendors grilling up traditional Philippine dishes and various meat skewers. There were plenty of nights we just ate the street food.
· Chili Bar has great food and a fun party atmosphere at night
· JG's Grill – Wide variety of Southeast Asian cuisine and fresh seafood
· Eskapo Verde Restaurant – If there is one place to eat on your trip on Cebu, we would say its this restaurant. This is an amazing place to go to for the hiking and kayaking along the mangroves, as well as all of the ecological work and education they are doing to preserve the reefs. But the food! The food is incredible. The menu is a mix of Philippine and Western dishes. You also must have the deserts. We can’t rave enough.
Main Attractions:
· Sirao Gardens
· Panagsama Beach
Depending on the time your flight gets in you can visit the Sirao Gardens. The entrance fee here is 100 pesos or less than $2, but the gardens are adorned with some of the sculptures and structures that make the experience come alive even more. The gardens themselves are gorgeous, but the scenery across the landscape of endless hills and mountains made it all the more special. After this stop off it will be about a 3 hour journey down to Moalboal. If you’re taking a shared van from the airport, again remember to take your Dramamine beforehand.
Once in Moalboal we would just get familiar with the town and go for a swim in the ocean right off Panagsama Beach. We snorkeled all around Cebu and Bohol, but this was still our favorite place. 20 feet off the beach there were the biggest schools of sardines we could have ever imagined with thousands of them all swimming in unison. There was a moment when Tara kicked her feet towards the formation scattering the sardines around the current she created, only to reveal a giant sea turtle that was swimming in the middle of the group. We loved this beach and made it a point to snorkel here every day for even just 20 minutes as it was absolutely teaming with life.

Day 2: Go Chase Some Waterfalls
Where to Eat:
· Nicolina's Place – Nice little hole in the wall with local dishes that is central to the waterfalls
· Try any of the bakeries that line the road all the way around this side of the island. They are incredibly cheap like 10 cents per pastry and have selections not found in the West.
Main Attractions:
· As always ending the day with a snorkel and swim on Panagsama Beach is about as good as it gets for sunset.
Hikes:
· Kawasan Falls – 4 miles and 920 feet of gain
· Inambakan Falls - 0.8 miles and 400 feet of gain
· Dao Falls - 1.8 miles and 240 feet of gain
· Binalayan Hidden Falls - 1.2 miles and 80 feet of gain
Kawasan falls is the most famous of the four on this list and the most crowded so we got up early and were the first ones there when it opened at 6 AM. The fee here is 200 pesos per person and the area is famous for its canyoneering tours through the canyon. You can actually hike up about 5 different waterfalls on your own without a guide and each one has its own personality. The main falls is pretty close to the entrance and has the largest pool for swimming. Keep climbing and you will see the dam waterfall, natural slides, areas to cliff jump, and bamboo bridges through the jungle.


It is a 40-minute scooter ride from Kawasan down to Inambakan falls, but once you’re in this area each of the next 3 waterfalls are only about 15 minutes or so from each other at most.
We were lucky enough to have inambakan falls to ourselves with our early start for the day. This is another area where there are multiple levels and waterfalls to scramble up making it a choose your own adventure style hike, going as far as you’d like. The water here is a beautiful milky emerald color and perfect for swimming. The fee here is 50 pesos per person to enter and 10 pesos to park. There will be people offering to guide you here for a fee, but the trail is very clearly marked and a guide is not necessary.

Dao Falls is next and was incredibly interesting as the waterfall almost formed a bowl around the canyon. This waterfall was free and there were fun spots to cliff jump, about 10 feet tall, right along the hike to the main falls. There is also a fun suspension bridge at the beginning of the hike that is perfectly picturesque.


The final waterfall on our list was actually our favorite and a hidden gem amongst all of the other famous ones in the area, Binalayan Hidden Falls. The entrance fee here is 50 pesos and this one actually does require a guide who works on tips. While the mandatory guide can be annoying at times, our guide on this hike was absolutely amazing and we were so glad he was there. He gave us all of the best places to cliff jump and showed us where to enter the water. There are some carved rock formations under the falls that you can boulder and he will even show you where the best hand and feet holds are or give you a hand if you need it to get into the small caves. As a show at the end he even climbed the 50 feet up to the top of the falls and jumped from the top where the landing has a pretty small margin for error as the pool at the bottom of this falls is the smallest you will see all day. We loved the experience and tipped him well as he deserved it.

Our insane guide jumped from the top of this waterfall, another 30 feet up.
We enjoyed the scooter ride back and stopped at several hole in the wall shacks and bakeries to try some of the local fare.
Day 3: Enjoy Osmena Peak at Sunrise and the Perfect Basdaku Beach
Where to Eat:
· Patimz Bistro – A great breakfast spot open early right next to Osmena Peak
· There are actually not a lot of restaurants on Basdaku Beach and the ones that are there are overpriced for the quality of food we thought. It is best to stop back into Basidot for a bite before heading over to the beach.
Main Attractions:
· Basdaku Beach
· Turtle Bay Beach
Hikes:
· Osmena Peak - 0.5 miles and 200 feet of gain
If you want to catch sunrise you should get up at 5 AM and arrange a tour or have a dirt bike to get up the road to Osmena Peak; however, it is worth it as this peak overlooks the entire island and you will be able to see across multiple islands in the area. This is another good one to take Dramamine before your journey as the roads are rough.

We didn't quite make it to the top, but the views were still stunning.
After the journey up to the peak and short hike we spent the afternoon with other travels we met at Basdaku Beach. The glistening white sand beach and turquoise water made this the most spectacular beach we have ever been too. There are restaurants along the beach that have food and cocktails. This is also the perfect spot to watch sunset. We aren’t typically big sit on the beach type of people, but it was easy to spend several hours here relaxing in the sand and taking in the spectacular view. As with all of the beaches in the area Basdaku and Turtle Bay have excellent snorkeling.

This is a great day to explore the street food around Basdiot when you head back into town as the scene really comes alive at night. Or end your night with drinks and pool at the Chili Bar.
Day 4: Visit Busay Cave and Eskapo Verde Before heading down to Bohol
Where to Stay:
· Gloria's Beach House – In Bohol. For $25 per night with air conditioning and a beach view from your room, this place is a steal.
Where to Eat:
· Eskapo Verde Restaurant!
Hikes:
· Eskapo Verde - 1.5 miles and 10 feet of gain
· Cave Busay – 2 miles and 340 feet of gain
We have been to our fair share of caves around the world, but Busay Cave was something else. The entrance was free, but they did require a guide to accompany you who worked on tips and we were glad to have him. This cave has a fresh water spring in it, snakes and bats, tons of massive stalactites, and the ending of the cave brings you to a massive opening that looks like a mouth with canine teeth. The hike itself is not very strenuous and the cave is mostly flat. The spring water is refreshingly cool and this was a fun way to break up some of the beaches and waterfalls.

A short 15-minute scooter ride, mainly down the road you came will lead you to Eskapo Verde, a tranquil paradise of environmental restoration. The owner here is actually British. He has a passion for the local ecology and will truly make you feel like you’re at home just talking to him. Charisma is an understatement. Through his work he has replanted thousands of mangroves and completely restored the area. The resort offers a great kayaking tour through the mangrove tunnels with a local guide, which we highly recommend. It was such a cool experience and rivaled any of the giant mangrove forests we’ve been through in Florida. Afterwards stop at the restaurant for an amazing freshly cooked meal, with the best deserts we had in just about all of Southeast Asia. After this stop off you will head towards Oslob, your midway point to Bohol.


From Moalboal you will take a bus about 1.5 hours down to the town of Bato. You can Google “Bus Journey to Oslob via Bato” and this will direct you to the bus stop, it is right across from the Moalboal Seaside Park in the Southeast corner of the city. Remember when in doubt, you’re taking a bus South towards Oslob. In Bato you will then switch buses to one going towards Cebu City via Oslob and tell the driver you’d like to be dropped off at Quartel Beach in Oslob. This portion is only a 40-minute ride. Buses are constantly going through this route all day, so finding one should not be a problem as long as it isn’t too late at night.
From here we had a quiet evening on the beach staying at Gloria’s Beach House which was one of the best sleeps we had on the trip. The town of Oslob is not nearly as populated and quiet at night. Rest up for another partial travel day tomorrow.

The sunsets on Cebu and in the Philippines do not disappoint.
Day 5: Get to Bohol and Base yourself in Panglao
Where to Stay:
· Bohol South Beach Hotel – For $55 per night with a pool right on the beach this is a 3-star hotel that will feel like 5-stars. The rooms are quite luxurious and everyone on the property was wonderful. Yes, this has air conditioning!
· Bohol Beach Club – If you want to splurge, at $275 per night this full on resort is located on one of the best beaches on the island. The amenities look amazing and the pool on the property is huge.
· There are also plenty of hostels on the island with beds for only $15-20 per night.
Where to Eat:
· The Buzzz Café – in Panglao. Everything here was so fresh and the smoothies/ice cream have the best fruit flavor.
· Pisces Restaurant and Bar – If you want nightlife in Panglao this is your spot. However, go earlier and they have great food as well. This is a more upscale, modern bar, restaurant, and club.
· Garlic 'n lemon bistro – The curry here was outstanding and they also have more Western Italian dishes.
· Earth Restaurant – This is on the pricier side for the Philippines, but the sushi and smoothies were great and a nice change of selection.
Main Attractions:
· Libaong White Beach, Doljo Beach, and Alona Beach were our favorites, and all had nice snorkeling in Panglao.
If you have time in Oslob you can certainly dive with the whale sharks, that is what this area is known for. We did not do this because the tour operators bait the whale sharks in this area, which in our opinion is ecologically irresponsible as it messes up their migration patterns, leads them to get hit by boats more often, and creates a zoo like living situation for animals that need space more than anything else.
Another option that’s a little more environmentally friendly would be a morning visit to Oslob Macaque, a monkey sanctuary where you can feed the monkeys, although they can get aggressive! Otherwise we would just go for a morning snorkel at the beach and enjoy a laid-back morning before the ferry. Also remember to take your Dramamine.

Not sure what kind of fish this was, but it did have some teeth! We could snorkel everyday in the Philippines and not get sick of it.
Getting to Bohol now is just a quick ferry ride. The ferry departs from behind Quartel church. The only ferry between Oslob and Panglao is run by Apekop Travel. It takes 1.5 – 2 hours depending on the water roughness and costs about $17 per person. Keep in mind the ferry only goes once per day at 11:30 AM! The ferry should land you at Tagbilaran City Port around 1:30 PM.
Once in Tagbilaran we rented a scooter for about 350 pesos or $7 per day to travel down to our base for the next two nights in Panglao, a small island surrounded by incredible beaches and diving. Enjoy another wonderful beach evening and take in paradise.
Day 6: The Chocolate Hills and Waterfalls of Bohol
Where to Eat:
· Estrella Villa – On the way out of the Chocolate Hills this restaurant shack was delicious, get one of the rice meals and you won’t regret it.
· All along the way back to Panglao there is a variety of roadside vendors cooking various local dishes and our favorite meat skewers. The grilled meat skewers are a healthier alternative to a lot of the fried meats you will find in the Philippines. We went pretty hard on these.
· The many restaurants above in Panglao
Hikes:
· Chocolate Hills – 2.8 miles and 200 feet of gain
· Camugao Falls – 1 mile and 250 feet of gain
· Mag-Aso Falls – 0.7 miles and 197 feet of gain
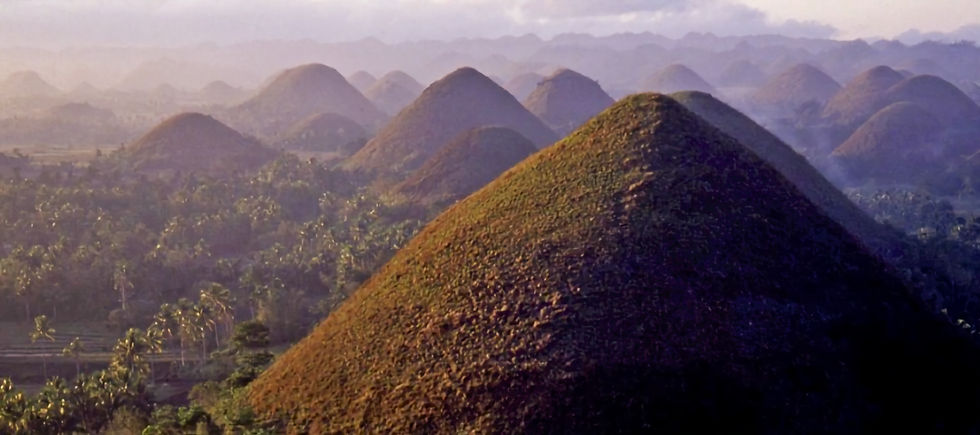
This is an adventure day and if you’re going to get to the Chocolate Hills on a scooter before sunrise (which is well worth it) we suggest leaving your hotel at 3:30-4 AM depending on the time of year. The hike up to the viewpoint over the Chocolate Hills is only 1.4 miles each way and relatively flat with only 100 feet of elevation gain. Sunrise over this location is stunning. The geological formation of the Chocolate Hills is over 1,000 different hills or mounds covered in grass. The density of the hills creates an illusion across the landscape that will have you constantly muttering “woooow”. The entrance fee here is 150 pesos per person and they will be ready for the fee at even the crack of dawn.
We didn't quite make sunrise, budget a little extra time on the scooter.
After your sunrise hike, the road back down to Panglao is littered with waterfalls including our two favorites Camugao Falls and Mag-Aso Falls. Camugao falls is a tall streaming falls with coconut trees nearby and a large swimming area. The fee to enter is 50 pesos per person or less than a dollar. Depending on the rainy or the dry season, this waterfall may only be a small stream from the top, but the hike through the forest and the viewpoint or worth it alone. There is something about trekking through the jungle in the Philippines that just feels so sacred and more special than anywhere else we have been.

Mag-Aso falls is smaller in scale, but has a double decker waterfall that is fun for cliff jumping and a more secluded setting that feels lusher than Camugao due to the density of the forest around the falls. This waterfall is also 50 pesos per person and is a wonderful place to swim. After this we headed back to Panglao with a 50 minute long scooter ride to end the day at the beach and have a nice dinner in town.
Day 7: Tarsier Sanctuary and Back to Cebu City
Where to Stay:
· C&W Royal Oceancrest Mactan – This hotel was close to the airport and had a nice pool for an evening dip on our last night. Cebu City with its concrete jungle will actually feel hotter than the rest of the island, at $35 per night this location is hard to beat and they even have a kid’s club!
The Tarsier Sanctuary on Bohol is one of the experiences that we will never forget. It is right up there with the elephant rescue we visited in Thailand and the sloth rehabilitation center we saw in Costa Rica. The tarsiers are so insanely adorable it is hard not to squeeze them. This sanctuary is also truly dedicated to these unique primates you can feel the love and attention they give to the animals; they are not just there to take tourist’s money. It is easy to spend over an hour here between the mile long hike and the rehabilitation center, it is worth the hour trip from Panglao and the 80 pesos per person entrance fee.

After this we headed back towards Tagbilaran City Port to return our scoot and get the ferry back to Cebu City for our flight out the next day.
OceanJet ferries leave from Tagbilaran City Port to Cebu City every 40 minutes from 6 AM to 5:40 PM, so it is more than possible to explore the island for a bit before taking the 2 hour ferry back to Cebu City. There is an air conditioned seating section of the ferry that costs a mere $9.50 per person or the general open-air ticket which is only $6.50, take your pick.
We stayed the night in Cebu City and walked around the next morning, but really we didn’t feel the city itself had a ton to offer. Although, the C&W Royal Oceancrest Mactan was a wonderful place to stay. This is just a small section of what the Philippines has to offer.
Day 8: Fly on to Your Next Destination
For us a week in Cebu/Bohol was very relaxing, but we fell so in love with this country that we could have easily stayed a month and had our entire honeymoon just in the Philippines. In the future we plan to have an open-ended vacation to just the Philippines and backpack from island to island to our hearts content. We hope you found this itinerary helpful and that we inspire your odyssey.
Comments